With the arrival of the DNN Azure AD v4.0.x module, lot of new settings have been introduced to support scenarios that were already resolved with the twin module for Azure AD B2C. Things such as Role Sync, Profile sync (including the profile picture), JWT auth using Azure AD tokens on DNN WebAPI controllers, reusing the client-side token to call other services outside DNN and claim mapping are now supported.
Before continue reading, please note that Azure AD is supporting now 1.0 and 2.0 (preview) tokens, and there are some differences between them. I recommend to read "How to: Provide optional claims to your app" article
"While optional claims are supported in both v1.0 and v2.0 format tokens, as well as SAML tokens, they provide most of their value when moving from v1.0 to v2.0. One of the goals of the v2.0 Microsoft identity platform endpoint is smaller token sizes to ensure optimal performance by clients. As a result, several claims formerly included in the access and ID tokens are no longer present in v2.0 tokens and must be asked for specifically on a per-application basis."
I'm currently working on adapting the DNN Azure AD module v5.0 to fully supports the v2.0 Microsoft Identity Platform endpoint. The following instructions work for DNN Azure AD module v4.0.3 and later.
Configuring claim mappings
Let's start today with the new "User Mappings" tab.
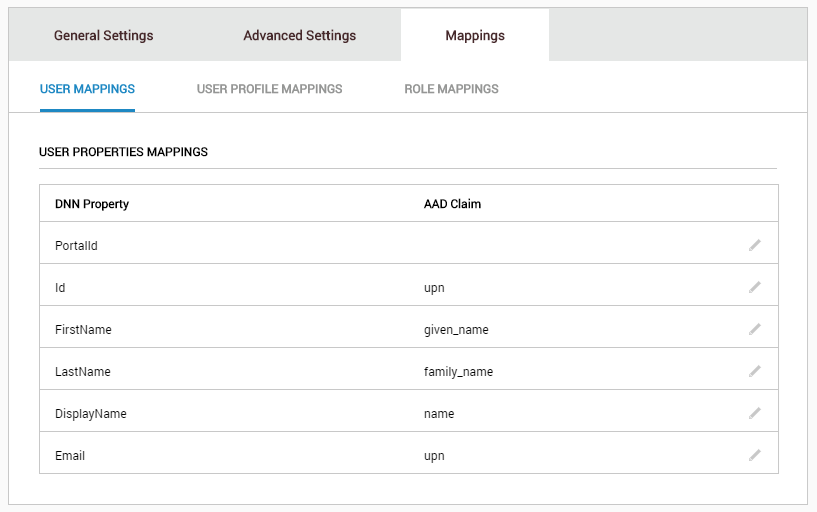
The new mappings tab has three subareas:
The list of supported claims for an application can be obtained from:
-
v1.0 tokens: https://login.microsoftonline.com/{tenant}/.well-known/openid-configuration?appid={client-id}
-
v2.0 tokens: https://login.microsoftonline.com/{tenant}/v2.0/.well-known/openid-configuration?appid={client-id}
Plus, the "core claim set" present in every token regardless of the policy. These claims are also considered restricted and can't be modified. More info at https://docs.microsoft.com/en-us/azure/active-directory/develop/active-directory-claims-mapping
Also note that "upn", "given_name", "family_name" and "unique_name" claims are part of the "core claim set" when using v1.0 tokens, but are not included by default when using v2.0 tokens. "unique_name" is only available on v1.0 so the recommendation is to use "upn" instead that is available on both versions.
Token configuration on the Azure AD application
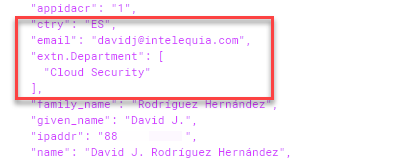
Once you have setup the application, by default you will be using the v1.0 endpoint so tokens will have the "core claim set" by default. A default issued v1.0 token will look like the one below:
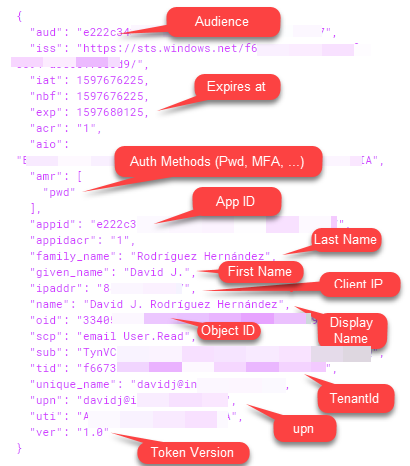
The most interesting claims from the DNN point of view are:
- "aud" (Audience): the audience of the token, normally the Application ID unless you change the audience setting on the JWT Auth settings on the module advanced settings
- "exp" (Expires at): expiration datetime in "NumericDate" format
- "amr" (Authentication Method References): indicating if the user used "pwd", "mfa", or other authentication methods
- "appid": the application id setup on the DNN module settings
- "family_name": the last name of the user as stored in Azure AD
- "given_name": the first name of the user as stored in the Azure AD
- "name": display name of the user as stored in the Azure AD
- "ipaddr": client IP address from where the token was requested
- "oid": object Id of the user as stored in the Azure AD
- "scp": scopes allowed for the token (the module issues a token for all the scopes configured unless something else is setup in the API Resource settings on the module advanced settings).
- "tid": Azure AD tenant id
- "unique_name": (only on v1.0 tokens), the unique name of the user. When using external providers such as MSA, can be in the format "live#user@tenant". Recommended to use "upn"
- "upn": the user principal name. Not available on v1.0 tokens and MSA (live.com, …) accounts.
So, by default, the default DNN Azure AD module configuration supports the default token settings to make the things easier to setup.
Setting up optional claims
With v1.0 tokens, you can specify two types of additional optional claims:
-
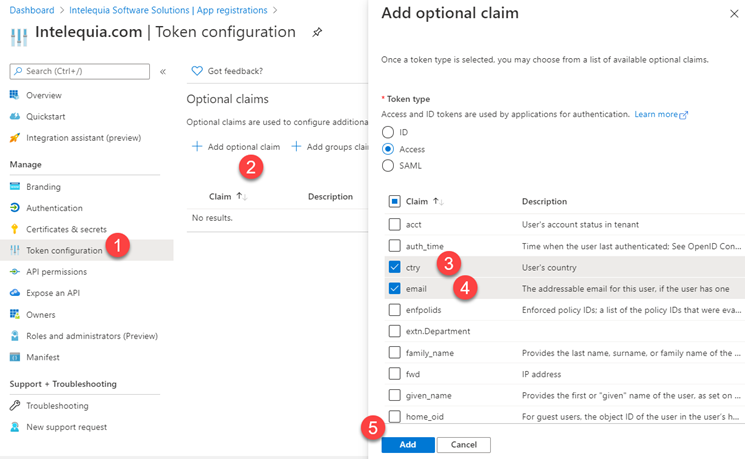
Built-in: you can specify optional built-in claims by selecting them through the token configuration application section or manually editing them directly through the manifest:
-
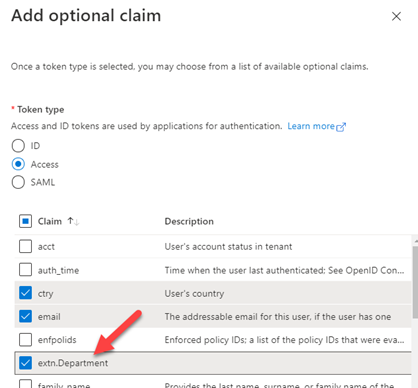
Extension attributes: you can create your own directory schema extensions for the application on the "Users" object and store your personal attributes directly on Azure AD. In order to do it, you need to modify the Azure AD schema first.
- Open a new Azure Cloud Shell in the Azure portal (icon on the top right portal area) using a PowerShell console, and run the following commands
-
Login into Azure Active Directory
> Connect-AzureAD
-
Set a variable with the application object Id. Note that this isn't the AppID, is the Application Object Id available on the application settings page on the Azure portal
> $appObjectId = "xxxxxxx-xxxxx-xxxxx-xxxxx-xxxxxxxxxx"
-
Create the application extension property "Department"
> New-AzureADApplicationExtensionProperty -ObjectId $appObjectId -Name "Department" -DataType "String" -TargetObjects "User"

-
Now set the setting of this user through the Graph API or just by executing the following PowerShell command, where $userObjId is the object Id of the user and <appId> is the App Id without dashes
> Set-AzureADUserExtension -ObjectId $userObjectId -ExtensionName "extension_<appId>_Department" -ExtensionValue "Cloud Security"

Once this is done, you can select the extension from the optional claims UI. The claim name will be "extn.<attributeName>" on the JWT token.
Now if you login again into the site, you will have the new claims as part of your token, and you can use them for mapping to user or profile properties.
Mapping non built-in Azure AD user object properties and more
All of what we have seen before has been done by using v1.0 tokens. What about adding non built-in properties, such as office location, phone number and so on? You can start using the new v2.0 tokens even while still using the 1.0 auth endpoint. How? I recommend first to take a look to the article "How to: Customize claims emitted in tokens for a specific app in a tenant (Preview)". Currently this way of customizing the claims is supported only by PowerShell, and when implemented, supersedes the claims customization offered through the portal today. Configurations made through the methods detailed in this section will not be reflected in the Azure portal (at the time of writing).
-
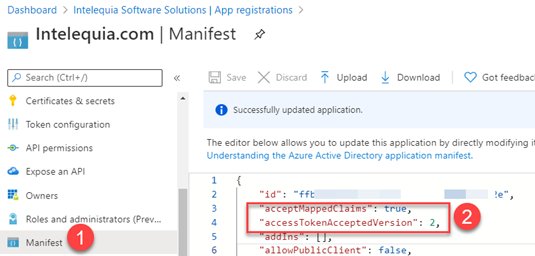
Edit the application manifest and set:
"acceptMappedClaims": true,
"accessTokenAcceptedVersion": 2
-
Open a PowerShell session in your desktop and install the AzureADPreview module (I tried to run this into the Azure Cloud Shell, and while I wasn't able to run the necessary commands):
> Install-Module AzureADPreview
-
Login into Azure Active Directory
> Connect-AzureAD
-
Obtain the service principal object
> $appID = "xxxxxxxx-xxxx-xxxx-xxxx-xxxxxxxxxx" # The AppID of the application
> $svcPrincipal = Get-AzureADServicePrincipal -Filter "servicePrincipalNames/any(n: n eq '$appID')"
-
Create a new Azure AD policy
> $policy = New-AzureADPolicy -Definition @('{"ClaimsMappingPolicy":{"Version":1,"IncludeBasicClaimSet":"true", "ClaimsSchema": [{"Source":"user","ID":"physicalDeliveryOfficeName","JwtClaimType":"officename"},{"Source":"user","ID":"country","JwtClaimType":"country"},{"Source":"user","ID":"givenName","JwtClaimType":"given_name"},{"Source":"user","ID":"surname","JwtClaimType":"family_name"},{"Source":"user","ID":"displayName","JwtClaimType":"name"},{"Source":"user","ID":"userPrincipalName","JwtClaimType":"upn"}]}}') -DisplayName "IntelequiaWebMappings" -Type "ClaimsMappingPolicy"
-
Assign the new policy to the application
> Add-AzureADServicePrincipalPolicy -Id $svcPrincipal.ObjectId -RefObjectId $policy.Id
-
Create an application signing key if not created before. This is necessary to use policy-based claims.
> $appObjectId = "yyyyyyyy-yyyy-yyyy-yyyy-yyyyyyyyyy" # This is the object id of the application that can be found in the portal, not the application Id
> New-AzureADApplicationKeyCredential -ObjectId $appObjectId -CustomKeyIdentifier "MySigningKey" -StartDate "11/7/2020" -Type "Symmetric" -Usage "Sign" -Value "P@assw0rd1!"
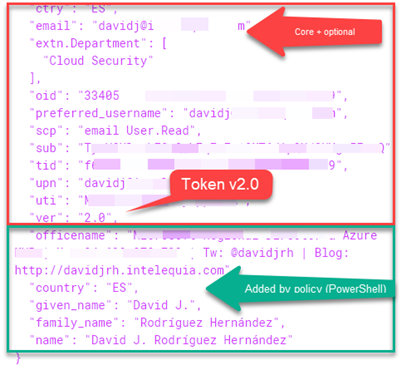
As result, we get a token like the one below. Note that the token includes the core claims set and the optional ones specified in the portal (because in the policy the "IncludeBasicClaimSet" was set to "true"), plus the claims added by setting the policy to the application.
References